
Group Tailwind CSS classes into named styles, assign them to elements and change them in one place. Use component styles that compile into CSS rules, or class styles that set classes on the elements, and manage both in the Style manager.
DocsTailwind CSSDocsTailwind CSS2026-10-24
Styles
Styles group Tailwind CSS classes under a name. Assign a style to as many elements as you like, and when you change the style, every element that uses it changes too.
This page describes Tailwind CSS 4 projects. Styles work the same way in Tailwind CSS 3 projects. Styles are part of the Tailwind Visual Editor in Pinegrow Desktop and Pinegrow Online.
Styles are saved with the project, so they need an open project. If you open a single page without its project, Pinegrow asks you to open the page as a project first.
Component styles and class styles
Pinegrow has two types of styles:
- Component styles compile into regular CSS rules. The style name is a CSS selector: a style named
h1styles every<h1>element in the project, and a style named.author-cardstyles every element with theauthor-cardclass. The HTML keeps only the selectors, not the Tailwind classes. Use component styles when you don't control the HTML, for example content from a CMS, or when you prefer selector-based CSS. See CSS styling with Component Styles. - Class styles put their classes into the
classattribute of every element that uses the style. Pinegrow remembers which elements use which style and updates their classes when the style changes. Use class styles if you want the Tailwind classes on the HTML elements.
Component styles need the Tailwind CSS Design panel to be active in the project, because Pinegrow adds them to the Tailwind CSS stylesheet that the Design panel compiles. See Design panel and the built-in compiler. Class styles work in any Tailwind CSS project.
Choose the type of new styles
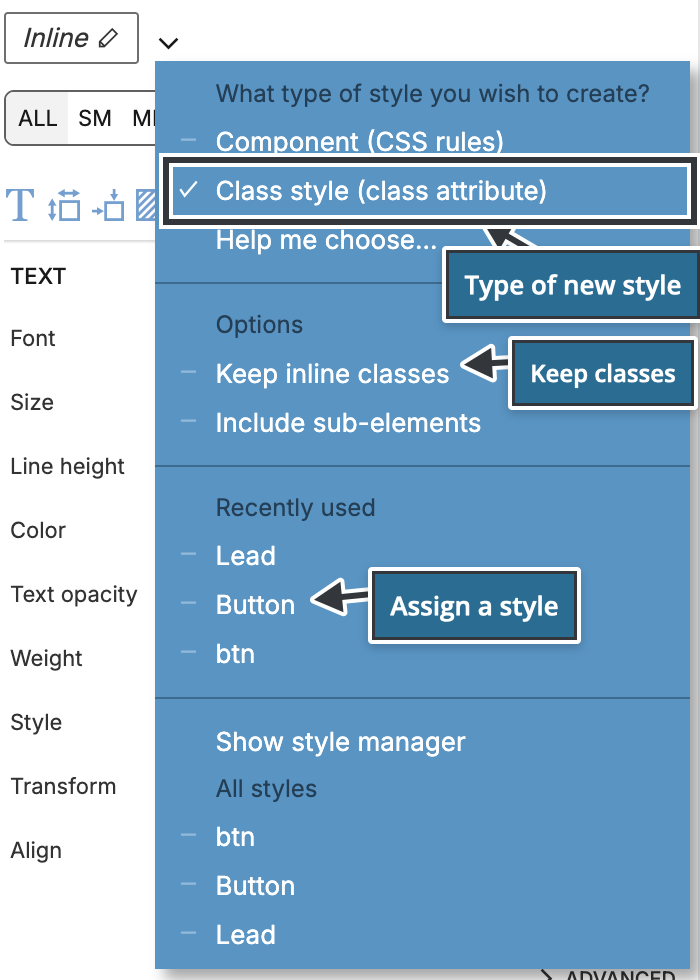
Select an element and click the arrow at the end of the style pills in the Visual controls panel. Under What type of style you wish to create? choose:
- Component (CSS rules)
- Class style (class attribute)
- Help me choose… explains both types and lets you pick one.
The choice applies to new styles and is saved with the project. Projects use component styles by default when the Design panel is active, unless the project already has only class styles. If the Design panel is not active, Pinegrow tells you that component styles can't be used in the project.
Style pills and Inline mode
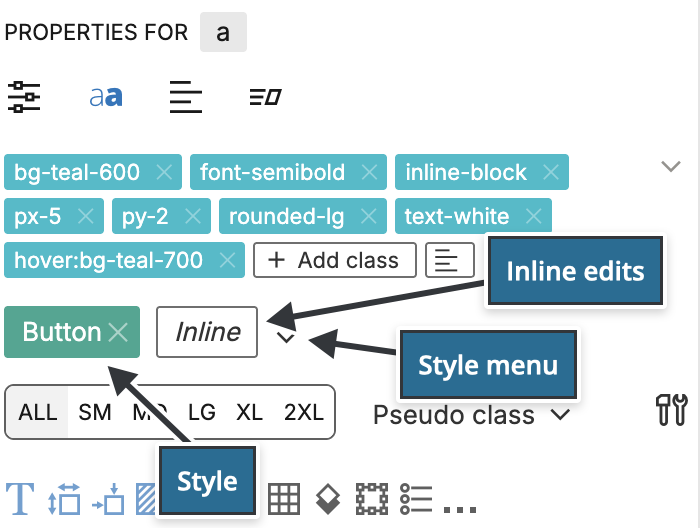
The style pills at the top of the Visual controls panel show the styles of the selected element, followed by Inline. The highlighted pill decides where your edits go:
- With a style pill selected, changes in the Visual controls and the Class inspector change the style.
- With Inline selected, changes affect only the selected element and not the style.
Create a style
- Select an element and style it with Inline selected.
- Click the pen icon on the Inline pill.
- Type the name of the style and press Enter or click Ok. Press Esc to cancel.
All classes of the element go into the new style. To use only some of them, select the classes in the Class inspector, right-click the element row and choose Create a new style.
If the element already has a style, or is inside an element with a style, the pen icon first opens a menu:
- Create a sub-style of class style: makes a variant of the element's class style (see Sub-styles below).
- Add to parent style as sub-element state: adds the classes to the parent's style with a selector variant, so that they style only this element.
- Add to style: moves the inline classes into the element's style.
- Create a new style… creates a separate style.
For a component style, the name is its CSS selector, for example h1, .card or .card h2:
- If the selector is a class, such as
.card, Pinegrow adds the class to the selected element. - If the selector doesn't match the selected element, Pinegrow asks you to confirm before it creates the style.
- Only valid Tailwind CSS classes can go into a component style. Pinegrow lists the classes it left on the element.
group,peerandnot-prose(alsogroup/nameandpeer/name) always stay on the element, because they don't work in the compiled CSS rules.
Turn on Include sub-elements under Options in the style menu, or in the pen icon's menu, to also take the classes of the element's children. Pinegrow adds them with a selector variant, for example [&_p]:text-sm for the classes of a p inside the element.
Assign a style
Select one or more elements, click the arrow at the end of the style pills and choose a class style under Recently used or All styles. Each element can have one class style. Undo removes the assignment.
Component styles are not in this list, because they apply to every element that matches their selector:
- A component style with a class selector, such as
.card, is added by adding its class. Click the style name in the Style manager and choose Add to selected element. - To apply a component style with another selector, such as
h1, change the element or the selector so that they match. Several component styles can apply to the same element.
To remove a style from the selected element, click the × on its pill.
Keep inline classes
When you assign a class style, the element's classes are replaced by the classes of the style. To keep the element's other classes as inline classes, turn on Keep inline classes under Options in the style menu before you assign the style. The option stays on until you choose it again.
In the Style manager, Add to selected element & keep inline does the same for one assignment.
Edit a style
Select an element that uses the style and click the style's pill. Changes in the Visual controls and the Class inspector now change the style:
- A class style updates the classes of all elements that use it, in all pages that are open. To update the other files in the project, choose Update whole project & save changes in the Style manager (see below).
- A component style is compiled into the project stylesheet again, so the change applies everywhere the selector matches.
Locked styles can't be edited. Unlock them in the Style manager.
Make an exception with inline classes
To change one element without changing its style, select Inline and edit. For example, give one button a red background while the other buttons keep the style's color. The inline classes stay on the element next to the style.
Sub-styles
A sub-style is a named variant of a class style, for example a Red variant of an Alert style. Sub-styles work with class styles only.
- Select an element that uses the class style.
- Select Inline and style the variant.
- Click the pen icon on Inline and choose Create a sub-style of class style: followed by the style name.
- Name only the variant, for example
Red, notAlert Red.
The element's pill then shows the style and its sub-style.
Manage styles in the Style manager
The Style manager panel lists all styles of the project. Open it with Show style manager in the style menu.
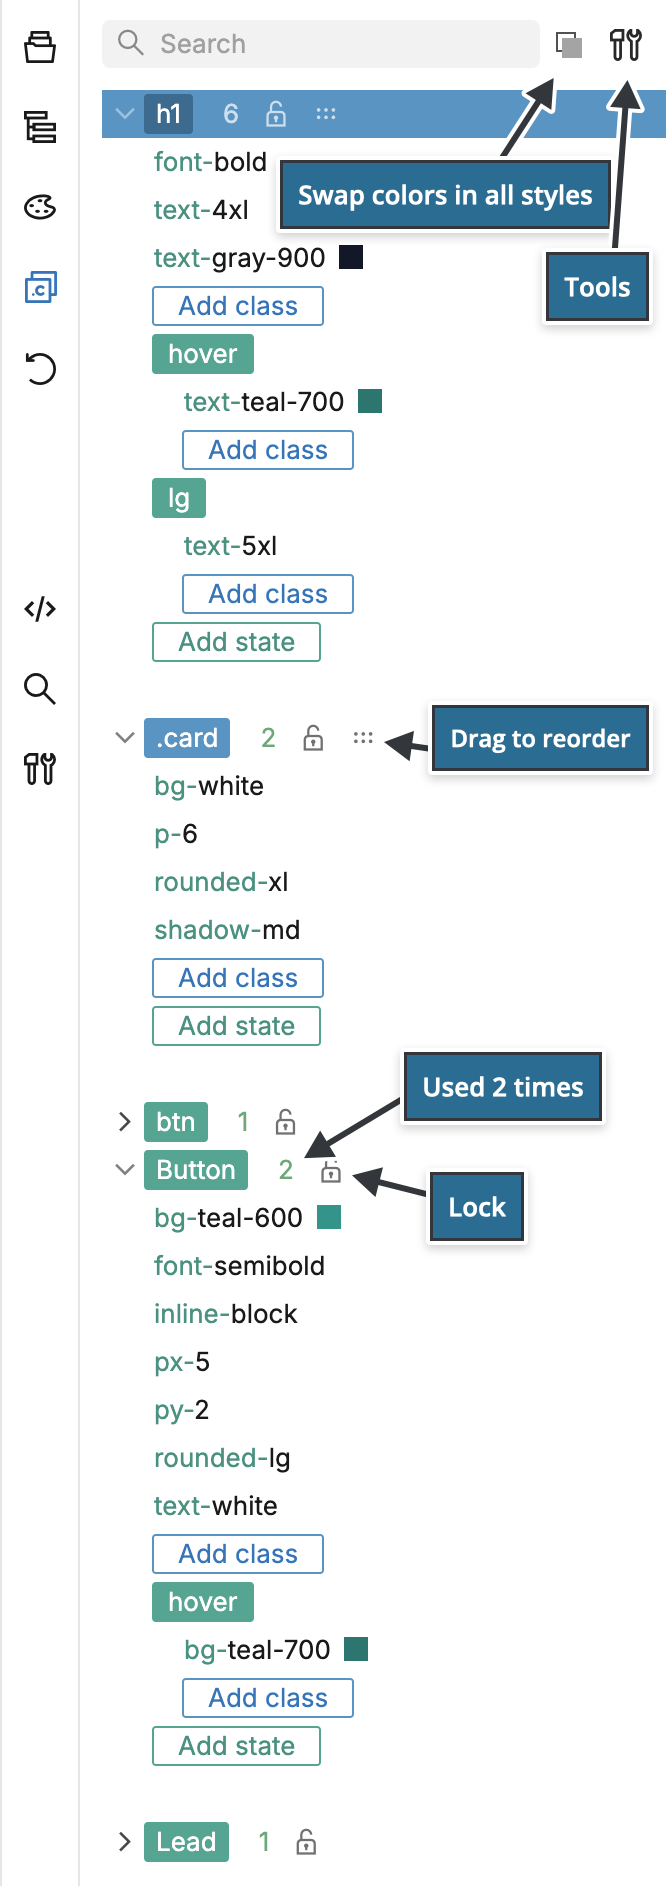
- Type in the search box to find styles and properties.
- Click a class to change its value. The Style manager uses the same tree as the Class inspector.
- The number next to a style shows how often the project uses it. Click it to select an element with the style or to update the count.
- Click a lock icon to lock or unlock a style.
- Drag component styles to change their order in the stylesheet.
- The Swap colors… button swaps colors in all styles.
The tools icon at the top of the panel opens these commands:
- Expand all and Collapse all.
- Lock all and Unlock all.
- Update usage counts scans the project and counts how often each style is used.
- Update whole project & save changes applies class style changes, renames and deletions to all files of the project, not only to the open pages, and saves them.
Style actions
Click a style name in the Style manager, or right-click a style pill in the Visual controls panel, for the style's actions:
- Add to selected element, Add to selected element & keep inline, Remove from selected element and Remove & leave classes on the element.
- Add style to all matching elements finds the elements on the page that have the same classes as the class style and assigns the style to them.
- Edit as code… edits the style's classes as text.
- Swap colors replaces a color in the style.
- Duplicate style… copies the style, with or without its sub-styles.
- Rename style… renames the style and updates the whole project. Pinegrow saves all changed files, and the rename can't be undone.
- Delete style deletes the style and removes its classes from the elements.
- Delete style & keep classes on elements deletes the style and leaves its classes on the elements as inline classes.
After deleting a class style, use Update whole project & save changes to remove it from files that are not open.
Where styles are stored
Styles are saved in projectdb.pgml in the project folder, together with the Design panel settings and other project information. The file is HTML-like text, so you can keep it under version control. Pinegrow doesn't publish it.
Class styles also leave two attributes on the elements that use them:
data-pg-class-stylenames the assigned style.data-pg-class-style-inlinelists the element's inline classes.
Keep these attributes in your project files. Without them, Pinegrow no longer knows which elements use which style. Browsers ignore them, so the published pages work with or without them.
Component styles are written into the Tailwind CSS source as an @layer components block with one @apply rule per style, and compiled with the rest of the stylesheet:
@layer components {
    h1 {
        @apply text-gray-600 text-xl lg:text-3xl;
    }
}
With the built-in compiler this happens on every change. With an external build process (Pinegrow Desktop), Pinegrow writes the block into your Tailwind CSS source file and your build tool compiles it. See CSS styling with Component Styles for details.